Sunday, December 30, 2012

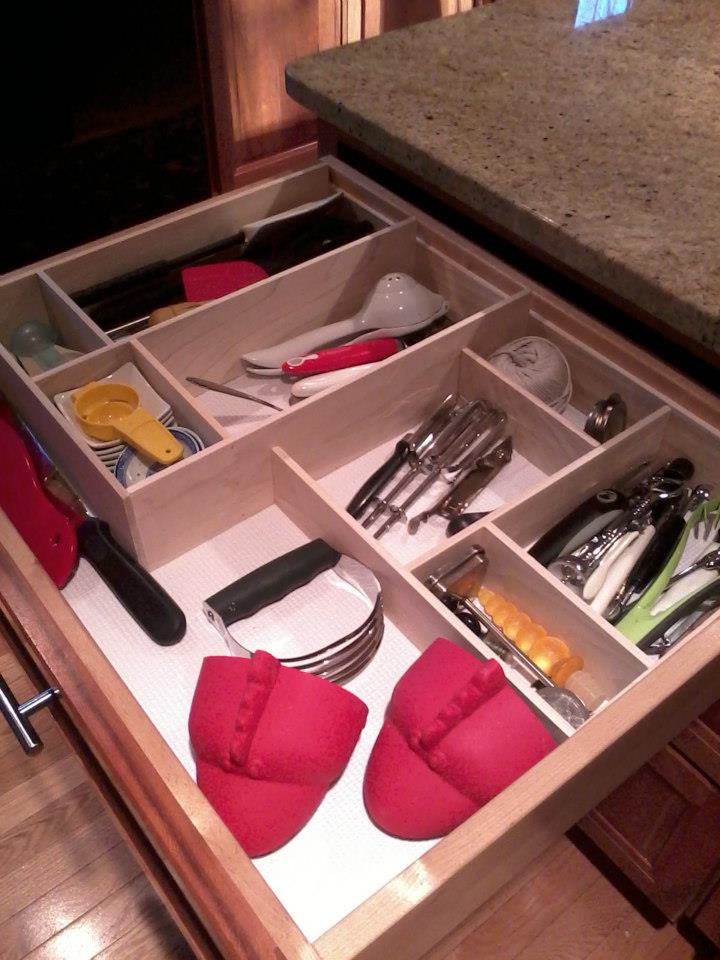
Time to clean out the kitchen drawers!

 
Ever get tired of looking at your kitchen gadgets sliding around in the drawers?

Yes...... well, I did something about it!

I have looked at what dividers were available to purchase but never found a perfect fit for all of my particular thingamabobs. So I decided to measure and build my own!! Here is the first drawer finished – only five more to go!
They are easy to make. First inventory what you have and decide how the dividers will be sized and laid out. Draw what you want on paper and label the length and height of each piece of lumber. Make sure the overall size is 1/8” smaller than the inside of your drawer. Check the height of the drawer as well or you won’t be closing that drawer once the divider gets made!
Supplies needed; compound miter saw, hammer, tiny ½” brad nails, wood glue, sandpaper, and lumber. I bought 1/4" thick x 4 feet long poplar boards at +Lowe's Home Improvement, buy the size that would work best for the height of your drawers.
Cut the lumber into pieces then glue and nail them together according to the drawing. After the glue has dried, lightly sand any rough edges and polyurethane or paint your custom drawer divider.

Remember - safety first! If you are not tool friendly have someone cut the boards for you.
 

Friday, December 28, 2012

Dreaming of Paris!


Some things you photograph and they always stay fresh in your mind and these pastries are top on that list!
 
This little bakery in Paris drew me in… I smelled this wonderful aroma before I even saw the store front. It wasn’t very big inside but the impact was enormous, the smell of warm yeast breads just baked grabbed your attention then the visual images of the artfully designed pastries saturated in vibrant colors made your mouth water.
 
 
 If these pastries were made in Claude Monet’s day could they have been part of his inspiration as a French Impressionist painter? I'd like to think so because they definitely inspired my creativity. 


My modest attempt at baking this Christmas could never stand up to the beautiful pastries I photographed in Paris but never the less my family enjoyed what I made for them. And I do love to bake!


Just had to add the Palais Royal Metro/subway entrance.
It was my favorite stop! Click here for location
Looks good enough to eat!


Tuesday, December 25, 2012

Peace!

Merry Christmas!
From our house to yours.
Wishing you the best for today and every day.
                                                Kathy

Sunday, December 23, 2012

Raspberry Turnover made with Puff Pastry


My first try at puff pastry and to my total disbelief it was a success! This daring culinary endeavor all started back in September; I was looking to use up some left over raspberry filling from a cake I had made and I thought – turn overs! When I was a little girl my Mèmè made them at camp. Awwwe those days at the lake…. I remember eating them warm out of the oven, delish! Well I did turn it up a notch by deciding on puff pastry instead of the traditional pie crust pastry that Mèmè used. The result. Drum roll… melt in your mouth, layered, crumbly heaven! My son’s girlfriend even said they are her all-time favorite pastry I’ve made!

I was so intimidated making puff pastry but soldiered on and was amazed at how well it came together. If you are comfortable with making pie crust then you’ll have to try puff pastry.

Raspberry Turnover made with Puff Pastry

          Yield: 16       prep time: 90 minutes       cook time: 10 min

Puff Pastry Ingredients  
6 ½ - 8 oz. unsalted butter
2 cups plain flour
½ teaspoon salt
2/3 cup chilled water
Raspberry Filling Ingredients
Raspberry Filling by Henry & Henry (which I bought at a cake decorating store) Feel free to use any filling of your choice!
1 egg beaten with 1 tablespoon water, for egg wash
Instructions: Pastry        Adapted from ‘Cooking, a commonsense guide’
 If you have never made puff pastry before, you’ll find it easier to use the lower amount of butter. Melt (1 oz. of butter) in a pan. Sift the flour and salt into an oversized bowl and make a well in the center. Add the butter and water. Blend with your fingertips, drawing in the flour. You should end up with a crumb mixture – if it seems a little dry, add extra drops of water before bringing it all together to form a dough.
Cut the dough with a pastry scraper, using a downward cutting action, then turn and repeat in the opposite direction. The dough should now come together to form a soft ball. Score a cross in the top to prevent shrinkage, wrap and chill for 20 minutes.
Soften the remaining butter by pounding it between 2 sheets of baking paper with a rolling pin. Then, still between the sheets of baking paper, roll it into a 4 inch square. The butter must be the same consistency as the dough or the pastry layers will not be even.
Put the pastry on a well-floured surface. Roll it out to form a cross, leaving the entre slightly thicker than the arms. Place the butter in the center and fold over each of the arms to make a parcel. Turn the dough so that it looks like a book with the spine to the left. Tap and roll out the dough to form a 6 x 18 inch rectangle. Square off the corners – otherwise, every time you fold, the edges will become less neat and the layers will be uneven.
Fold the dough like a letter, the top third down and the bottom third up, to form another square, brushing off any excess flour. Turn the dough 90 degrees to bring the spine side to your left and press the seam sides down with the rolling pin to seal. Re-roll and fold as before to complete two turns. Wrap the dough and chill again.
Re-roll and fold twice more, chill, then repeat to complete six turns. On a hot day, you may need to chill after each turn. The pastry should now be yellow and ready to use – if it looks a little streaky, roll and fold once more. Wrap and keep chilled until ready to make turnovers.
Instructions: Turnover    Preheat the oven to 400 degrees F.
Flour a board and lightly roll the puff pastry into a 16 by 16-inch square. Cut into 16 smaller squares (4 x 4-inch each) and keep chilled until ready to use.
Brush the edges of each square with the egg wash and neatly squeeze about one tablespoon of the raspberry mixture diagonally on half of the square. Fold the pastry diagonally over the raspberry mixture and seal by pressing the edges with a fork. Transfer to a sheet pan lined with parchment paper. Brush the top with egg wash, sprinkle with sugar, make 2 small slits, and bake for 20 minutes, until browned and puffed. Serve warm or at room temperature.
 

Saturday, December 22, 2012

Crown Roast of Pork for Christmas!


I saw Anne Burrell make this crown roast and will be making it for Christmas this year. I usually would not use an untried recipe for a special get together but this looked so good I was salivating over it and I felt I could smell it roasting from the TV! I will post after Christmas to let you know how it was received! One big change though; I will marinade the pork lion overnight in a salt brine and then we are going to smoke the pork loin for an hour with Hickory the day before cooking.

Update; December 25 and the crown roast was delicious!SOOO I messed up! Major blunder, I did not get a photo before we cut the roast but believe me it was a beautiful round crown roast with the ribs up just like the rockettes in a high kick!
 
The hint of pink you see is from smoking the meat.

Crown Roast of Pork                                                                    Recipe courtesy Anne Burrell

Pork:
  • 4 cloves garlic, smashed and finely chopped
  • 1 bunch fresh rosemary, picked and finely chopped
  • 1 bunch fresh sage, picked and finely chopped
  • 1/2 teaspoon crushed red pepper
  • 1/2 cup extra-virgin olive oil
  • One 13-rib pork loin, membrane between the rib bones slit to allow the pork to curl around and stand up
  • Kosher salt
  • Pear and Chestnut Stuffing, recipe follows

Pan Sauce:

  • 3 cloves garlic, smashed
  • 2 ribs celery, cut into 1/4-inch dice
  • 1 Spanish onion, cut into 1/4-inch dice
  • 1/2 fennel bulb, cut into 1/4-inch dice
  • 8 cups chicken stock
  • 2 cups dry white wine
  • 2 bay leaves
  • Kosher salt

Directions

After pork loin has marinaded overnight in a salt brine and smoked for an hour with Hickory.

Preheat the oven to 450 degrees F.
For the pork: In a small bowl, combine the garlic, rosemary, sage and crushed red pepper with 1/2 cup olive oil. Sprinkle the pork generously with salt and brush both sides with the olive oil herb paste.

Stand the pork rack up and curl it around so that the two ends meet; be sure that the thick meaty part of the pork is on the inside. Secure the roast by tying it twice around the outside of the roast with twine.

Place the pork in a large roasting pan fitted with a pizza pan tray and stuff the center of the pork with the Pear and Chestnut Stuffing. (There will be leftover stuffing. Place the leftover stuffing in a baking dish and cook for 35 minutes at 350 degrees F.)

For the pan sauce: Place the garlic and diced veggies around the pork. Add half the chicken stock, the wine and bay leaves to the pan. Sprinkle everything with salt.

Cover the pork bones with aluminum foil to prevent the bones from burning. Place the pork in the oven. Roast until the pork is starting to brown, about 30 minutes.

Turn the oven down to 325 degrees F.

Roast the pork for 2 1/2 more hours, basting the pork occasionally. Rotate the pork a couple of times during the cooking time. If the liquid level reduces, replace it with the remaining stock.

When the pork is cooked to the proper doneness - an instant-read thermometer should read 140 to 145 degrees F - remove it from the oven. Carefully transfer the pork to a serving platter and cover it loosely with aluminum foil. Let the pork rest for 20 to 25 minutes.

Bring the pan juices to a boil. Taste and re-season if needed. Blend the veggies if desired to create a smoother sauce. I also like to leave them in.

To serve: Remove the twine. Scoop out the stuffing and cut the pork in between the bones to create chops. Top with pan sauce.

Chestnut and Pear Stuffing:

  • Extra-virgin olive oil
  • 8 ounces slab bacon, cut into 1/4-inch dice
  • 4 ribs celery, cut into 1/4-inch dice
  • 2 Spanish onions, cut into 1/4-inch dice
  • 1/4 fennel bulb, cut into 1/4-inch dice
  • Kosher salt
  • 4 sprigs rosemary, picked and finely chopped
  • 3 cloves garlic, smashed and finely chopped
  • 8 ounces peeled chestnuts, coarsely chopped
  • 3/4 cup dried cranberries
  • 4 Anjou pears, peeled and cut into 1/2-inch dice
  • 2 cups dry white wine
  • 12 cups cubed crustless, stale sourdough or peasant bread
  • 4 cups chicken stock, warmed

Coat a wide, straight-sided pan with olive oil and add the bacon. Bring the pan to a medium heat and let the bacon get brown and crispy.

Add the celery, onions and fennel and season with salt. Cook the veggies until they get soft and very aromatic, 8 to10 minutes. Add the rosemary and garlic and cook for 1 to 2 minutes more.

Toss in the chestnuts, cranberries and pears, and stir to combine. Add the wine and let it reduce by half.

Put the bread in a large mixing bowl and add the cooked veggie mixture to the bread. Stir to combine and douse the bread with half the stock. Use your hands to combine the bread, veggies and stock. Add more stock when/if needed to really saturate the bread. Season with salt and taste it to make sure it is delicious.

Tuesday, December 18, 2012

Quick Garlic Cheddar Cheese Drop Biscuit

For tender, flaky biscuits cut in the shortening with two knives or a pastry blender. Knead the dough gently, but do knead it – this improves the texture of the biscuits. These biscuits are wonderful right out of the oven so if you can time them with your meal it is so worth it.

Quick Garlic Cheddar Cheese Drop Biscuit

Yield: 6 to 10     prep time: 10 minutes     cook time: 10 minutes

Ingredients:

1/3 cup shortening
1 3/4  cups flour
2 ½ teaspoons baking powder
3/4 teaspoon salt
1/8 teaspoon garlic powder
1/2 cup grated cheddar cheese (Sharp cheese is best)
1/8 cup parmesan cheese
3/4 cup milk
Additional grated cheddar cheese to coat tops of biscuits

Instructions:

Preheat oven to 450 degrees F. Cut shortening into flour, baking powder, salt, and garlic powder with pastry blender until mixture resembles fine crumbs. Stir in grated cheese and just enough milk so dough leaves side of bowl and rounds up into a ball. (Too much mild makes dough sticky, not enough makes biscuits dry.)

Turn dough onto lightly floured surface. Knead lightly 10 times. Drop dough by spoonful’s onto greased cookie sheet. (If desired, first drop dough into additional grated cheese to coat the top.) Place about one inch apart for crusty sides, touching for soft sides. Bake until golden brown, 10 to 12 minutes. Immediately remove from cookie sheet if you’re not using parchment paper.


Saturday, October 13, 2012

Wild animal print Birthday cake!


This cake was fun to make and came about completely by accident. We had a cookout at the house which I had made some cupcakes for. My friend Melissa’s daughter fell in love with the cupcakes and asked her mom if I could make her Birthday/Graduation cake. Melissa asked if I would make the cake and voila! An animal print cake was born! Melissa’s daughter Brianna designed the cake, from the giraffe and zebra print to the inward cut angle of the two cake layers.


Pans; 10” square and 8” square. Cake bases; square 10” cardboard and 8” cardboard.  Buttercream frosting.  Fondant. Yellow, brown and black food coloring. Two 18” decorator bags and #2 Wilton tips.
Each cake has two layers. Each cake rests on a cardboard base that is cut slightly larger than the footprint of the cake. After the angle in the cake is achieved cut each cardboard base so that about 3/8” protrudes out from the cake all the way around.
1) To achieve the cut angle of each cake, dry stack the two layers of the 10” cake on the cardboard base and skewer with four skewers so it will not shift position as the blade slices through. Cut an inward angle from top to bottom using a knife or a “cake leveler and slicer”. When the cake is shaped to your liking now is the time to mark the cardboard 3/8” larger than the cake base, remove the skewers and cake. Cut the cardboard then place the lower cake layer back on the base that has been prepped with four small dollops of frosting to seal the cake to the cardboard base. Spread frosting atop the lower cake layer, and then top with the second larger cake layer. Replace the skewers and refrigerate for one hour to set the two layers.  (Repeat for the 8” cake)
 2) Take about one cup of frosting and thin out with 1 or 2 tbsp. of water to make a smooth workable consistency. This thinned frosting will crumb coat and seal the cake. Remove both cakes from refrigerator and frost tops and sides with a thin layer of this crumb coat frosting. This will trap crumbs within it so that when the top layer of frosting is added it will be crumb free. Remove the skewers and refrigerate cakes while preparing the next step.
3)  I wanted the appearance of the white frosting to mimic being covered in fondant and I found this creative video posted on You Tube that helped me accomplish the affect I was looking for. The original video has been pulled from You Tube but I located a similar one http://www.youtube.com/watch?v=0GfeQBUjxzA.Follow Use the instructions given and you will create such a smooth picture-perfect finish on your cake. (Repeat for the 10” and 8” cake)
Remember to keep cakes refrigerated when not working on them.
4) All right! Now the cakes are ready for the bling! I used fondant cutouts to create the patterns. For the giraffe affect I colored the fondant with yellow and a bit brown food coloring to make a golden sandy brown. Roll the fondant out and with a sharp knife cut the giraffe shapes.  Water down some brown food coloring and use a small piece of cheese cloth or a paper towel and dab into the mixture. Tap the towel on a paper plate to get off excess color. Take the dampened towel and dab the outer edges of each piece, gently blending the color so it fades away to leave the center of each piece golden sandy brown.  Carefully arrange the pieces on the cake.
5) The zebra pattern was so uncomplicated! Color the fondant with black food coloring. Roll out and then cut random strips, incorporate forked and curvy pieces within the pattern. Carefully arrange the pieces on the cake.
6) Prep your serving platter with four small dollops of frosting. Place the giraffe cake on the platter, the frosting will seal the cardboard cake base to the platter and stop it from sliding. Size and cut four skewers by inserting them in the cake to gage where to cut, these will be the supporting members for the zebra cake. Place them in a 6” square pattern to line up with and support the zebra cake. Next step is to prep for adding the zebra cake by placing four small dollops of frosting over each skewer in the giraffe cake. Carefully place the zebra cake on the giraffe cake.  Refrigerate.
7) With remaining frosting; color some of it green and some blue. Decorate the cake using two 18” decorating bags and two number 2A Wilton tips. Fill each bag with each color.  Remove cake from refrigerator, make ball shaped borders using the instructions from this Wilton web site. http://www.wilton.com/technique/Ball . For the finishing touch I made a pyramid shaped pile of balls on the top.
Enjoy and I hope this cake generates many yummy comments and smiles of satisfaction to the lucky people that get to eat it!


Sunday, June 24, 2012

My First Fondant covered birthday cake

Fondant!

I felt such a need to get my first post up so I searched through my photos and found this cake. I made it a few years ago for my son’s girlfriend Courtney. She is very special to me and I wanted to give her something unexpected. A little Coach purse, I even made a small lipstick to go on the outside. It was my first fondant covered cake and so much fun to make. I really like the zipper!


It will be a while before I post again because I need to buy a camera! Mine went missing on a weekend away last year. I have been borrowing my son Kevin's camera but found that food close ups have been a disaster. So until I have a decent camera I’m sorry to say that the posts will be far and few between.